 |
|

Getting Started Overview HammerKit is a professional-grade cloud-based web service design and deployment system with all the tools you need to create and launch web services. It allows you to build data-centric, feature rich services without coding and enables web designers to go beyond mock-ups and wireframes to build fully functional web sites. Getting support We have designed HammerKit to be easy to navigate and learn. This user manual is part of the support material that includes training videos and support forums that are provided to help you get the best from HammerKit. To access the support community for HammerKit go to http://support.hammerkit.com Creating your HammerKit Account To start creating web sites and services, you need to register your personal HammerKit Account. Using HammerKit is completely free. To create your account, complete the following steps: 1. Go to: https://my.hammerkit.com/user/new 2. Follow the instructions provided and register your details. 3. Remember to check your email to verify your account Once you have created your username and password you may log in and start using HammerKit. Logging in to your account Log in to your account at https://my.hammerkit.com/login with the username and password you created in the registration. Creating your first site Once you have logged into your Account Manager, you are ready to create your first site. The Account Manager is the place where you create and manage your different sites. The single sites you - or your customer - can access also directly without the Manager. In this example we will create a simple “Hello World” page. To do this click the ‘Create a new site’ button on the button bar. This will prompt you to give your site a Title, a URL, site specific username and password. (You may also opt to include Sample content on the site.) When the site has been created, click ‘Edit site’ to go to the Service Design tool. This will bring you to the site login page. Type in the username and password you gave your site. From the Start button (Blue Wheel in the bottom left corner), navigate to the Component Editor. 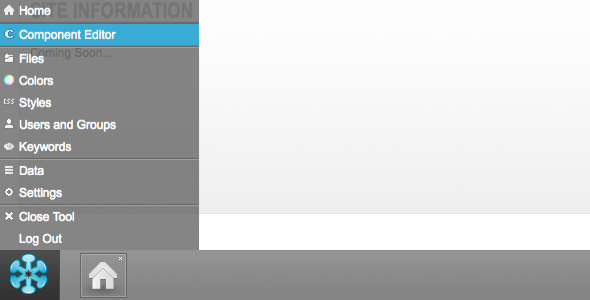 To create your ‘Hello World’ page, please repeat the following steps: 1. Create a component • Create a new component by clicking the ‘+’ sign in the component tray at the top left of the screen.  • Right-click on the new component and select ‘Properties’. 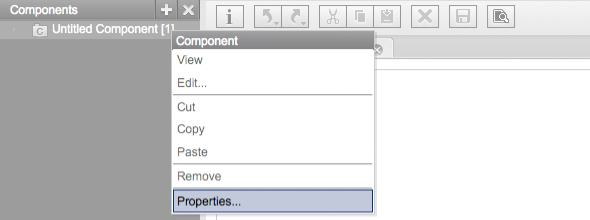 In the Settings box type the name “Hello World “in the Title field. • Select the type as a Content component. • Choose “No template” from the Template selection. 2. Add the content • Open the component by double-clicking on the component name. • Drag a Text element from the content section of the element tray on the left-hand side to the canvas. . • In the appearing text element Settings box: w Type ‘Hello World’ in text editor and style it with the font selections to your taste.. w Click ‘OK to save the element. 3. Save and Preview • Click the ‘Save’ button to save your component • Click the ‘Preview’ button to view your ‘Hello World’ page in a another browser window or tab. |
Product
|
Company
|
Community
|
Awards
|
||||||||||||||||||||||||||||||||||||||||||||||||||||||||||||||||||||||||||||||


